Search Site

Feed Section

Saturday, August 25, 2012

TechSource: Best Google Chrome Security Extensions

TechSource: Best Google Chrome Security Extensions


Best Google Chrome Security Extensions

Posted: 24 Aug 2012 07:27 PM PDT

Chrome, though briefly, recently surpassed the much-hated Internet Explorer to become the most popular browser in town. Launched in 2008, this freeware application has quickly outclassed Firefox making it quite a hit among Linux users old and new. And, despite the Google-made browser not being open-source, its free roots (that is Chromium) make it a viable choice for FOSS lovers.

Based on WebKit, Chrome is popular thanks to its blazing speed, and an even faster development cycle. The main reason for the Google-made browser's success, though, is that it proves to be fast, simple, and secure as compared to other browsers. Moreover, its minimalist interface has sparked a new competition amongst its rivals like Firefox, Opera and IE. Finally, coming to security, Chrome frequently checks itself against blacklists (one for malware and other for phishing) making it more secure as compared to its rivals.

That said, the free browser doesn't come with a complete security suite out of the box. There are many open doors from which hackers could intrude your privacy, despite the fact that Chrome is one of the most secure browsers around. Thankfully, though, there are some great extensions you can install to save yourself from the prying eyes of hackers.

So, without further ado, here's a list of the best security extensions for Google Chrome:


Google SSL Web Search

This extension, once installed, lets you change your search provider to use SSL by default. Secure Sockets Layer or SSL is a commonly used protocol for managing the security transmission of messages on the Internet. An encrypted SSL connection makes sure that all data passed between the browser and the web site server is encrypted by the sender and decrypted by the receiver. SSL can thus prevent unauthorized parties from gaining access to sensitive, confidential, or personal information such as phone numbers or addresses. Of course, you won't Google your own credit card number; however, there's a slight chance that your search history might be intercepted by your ISP or a rogue hacker. SSL will surely help you avoid that predicament.


Secure Bookmarks

If you use a shared computer, then you might not want to show your bookmarks to other users. Solving that little problem comes Secure Bookmarks, a cool extension that lets you password-protect your bookmarks. Once installed, you can create new bookmarks that will only be accessible to you and those who have your password.


Secure Password Generator

This is a really handy extension. Whenever you sign up for new sites, simply use this extension to generate a random, secure password for you. This would save you from the vulnerabilities of choosing a ridiculously predictable password.


WOT (Web Of Trust)

Web Of Trust is a nifty little extension that alerts you of malicious sites and indicates you how safe the site you're visiting is. It's a crowd-sourced safe-surfing tool that shows traffic light signals besides each site, so that you can rest assured that the site you're visiting is safe. How WOT works is millions of its users rate each site, and the ratings then are, in turn, used to give you an indication of the site's reputation.


Ghostery

Ghostery is a free extension that detects trackers, web bugs, pixels, and beacons placed by ad networks for invading your privacy. So, if you're worried about Facebook, Google, et al. watching over you in a creepy way, then by all means, install this extension.


McAfee Secure URL Shortener


Oh, those tiny little URLs are all over the web. Some of them can be trusted, and many look suspicious. To solve that problem, McAfee has come up with a neat solution. Whenever you shorten a URL with McAfee's Secure URL Shortener, it gets checked using McAfee's Global Threat intelligence information. Thus, whenever you, or your friend shortens a link with the extension, you can rest assured that the link is safe, and can be trusted.


Thursday, August 23, 2012

TechSource: How to Safely Exit When Ubuntu Freezes / Hangs

TechSource: How to Safely Exit When Ubuntu Freezes / Hangs


How to Safely Exit When Ubuntu Freezes / Hangs

Posted: 23 Aug 2012 03:34 AM PDT

You're working tirelessly on your project for hours. You are, as they say, 'in the flow'. And, for a change, the computer too works flawlessly like never before. What more can you ask for?

However, we all know that days like those don't come too often. A computer OS, no matter Windows, Mac, or Linux, is prone to hanging, freezing and crashing making our life difficult. What's more, the constant problems lead to even bigger problems if you don't exit your system safely during a freeze or hang. Our beloved Ubuntu too goes through these hiccups from time to time and exiting the desktop safely is the user's number one priority. So, if you're looking for ways to safely exit when Ubuntu hangs or freezes, here are some handy tips:


What to do when an application is misbehaving?


If you can move your mouse and access the launcher but only one application is hogging all your memory, you might be better off killing it. Let's say Firefox is running with about 50 tabs open, and you notice a tremendous slowdown of your desktop. Oh yeah, the same kind of slowdown wherein moving your mouse seems like a painful experience. We've all been there.

So, to fix this problem you'd have to either kill Firefox or wait for it to start responding. Usually it's better to wait, especially if you have 50 tabs open. However, if that isn't working simply press Alt + F2 and type in 'xkill' without the quotes.

Now, you'll see a crosshair instead of your pointer. Simply click on Firefox, and you'll see your desktop come back to normal.


Ctrl + Alt + Backspace


If your desktop is completely frozen or sluggish, then often times it's better to restart the X server. This is always a better option as compared to hitting the reset button on your laptop. To start using it, you'd have to enable the option first. Go to 'System Settings' -> 'Keyboard'. Then, go to 'All Settings' -> 'Keyboard Layout'. There, click on a small button that says 'Options'. Next, find the option that says 'Key sequence to kill the X server'. Enable the option and you're done. Now, anytime you get a frozen desktop, simply use the Ctrl+Alt+Backspace combo.


Magic SysReq key in case of a complete freeze

If your system is completely frozen, then you might want to restart it safely using the Magic SysReq key combo. Simply press Alt + SysReq (Print Screen) key then while holding those two keys, press R key for 1 or 2 seconds, then, after a small interval press E , the I, then S, the U, and finally B. Each key from R to B must be held for about 1 or 2 seconds.

So, to sum up, the combo is: Alt+SysReq+R+E+I+S+U+B

The best way to remember this key sequence is by using the mnemonic: Raising Elephants Is So Utterly Boring.


Written by: Abhishek, a regular TechSource contributor and a long-time FOSS advocate.


[HowtoForge] Newsletter 08/23/2012

HowtoForge Newsletter 08/23/2012
================================

*** Version 1.3 of the ISPConfig 3 Manual ***
=============================================

The next update of the ISPConfig 3 Manual is available in PDF format (version 1.3 for ISPConfig >= 3.0.4; Date: 10/25/2011).

Version 1.3 for ISPConfig >= 3.0.4 (Date: 10/25/2011)
Author: Falko Timme
333 pages

The manual can be downloaded from these two links:

http://www.ispconfig.org/ispconfig-3/ispconfig-3-manual/
http://www.howtoforge.com/download-the-ispconfig-3-manual


*********************************************
*********************************************


ISPConfig Monitor App for Android Phones
========================================

With the ISPConfig Monitor App, you can check your server status and find out if all services are running as expected. You can check TCP and UDP ports and ping your servers. In addition to that you can use this app to request details from servers that have ISPConfig installed; these details include everything you know from the Monitor module in the ISPConfig Control Panel (e.g. services, mail and system logs, mail queue, CPU and memory info, disk usage, quota, OS details, RKHunter log, etc.).

Download/Usage
==============

For download and usage instructions, please visit http://www.ispconfig.org/ispconfig-3/ispconfig-monitor-app-for-android/ .


*********************************************
********************************************


*** HowtoForge Now Has Its own Facebook Page ***
================================================

We at HowtoForge are proud to announce that our new Facebook page is now available under http://www.facebook.com/howtoforge. As most of you probably have a Facebook account, we want to use this additional channel to post updates and get feedback from you. Therefore we would like you to "Like" our page, share it with your friends, post comments, etc.

http://www.facebook.com/howtoforge
********************************************************************


New HOWTOs:
===========

* Installing Lighttpd With PHP5 (PHP-FPM) And MySQL Support On CentOS 6.3
* Creating Simple Virtual Hosts With mod_mysql_vhost On Lighttpd (Debian Squeeze)
* Creating Advanced MySQL-Based Virtual Hosts On Lighttpd (Debian Squeeze)
* Managing A Headless VirtualBox Installation With phpvirtualbox On nginx (Ubuntu 12.04)
* CentOS 6.3 Samba Standalone Server With tdbsam Backend
* Userdir Access On ISPConfig 3 Server

++++++++++++++++++++++++++++++++++++++++++++++++++++++++++++

Installing Lighttpd With PHP5 (PHP-FPM) And MySQL Support On CentOS 6.3
=======================================================================

Lighttpd is a secure, fast, standards-compliant web server designed for speed-critical environments. This tutorial shows how you can install Lighttpd on a Centos 6.3 server with PHP5 support (through PHP-FPM) and MySQL support. PHP-FPM (FastCGI Process Manager) is an alternative PHP FastCGI implementation with some additional features useful for sites of any size, especially busier sites. I use PHP-FPM in this tutorial instead of Lighttpd's spawn-fcgi.

You can find the document here:
-------------------------------
http://www.howtoforge.com/installing-lighttpd-with-php5-php-fpm-and-mysql-support-on-centos-6.3


Creating Simple Virtual Hosts With mod_mysql_vhost On Lighttpd (Debian Squeeze)
===============================================================================

This guide explains how you can use mod_mysql_vhost to create simple virtual hosts on a lighttpd web server on Debian Squeeze. With mod_mysql_vhost, lighttpd can read the vhost configuration from a MySQL database. Currently, you can store the domain and the document root in the MySQL database which results in very simple virtual hosts. If you need more directives for your vhosts, you'd have to configure them in the global section of lighttpd.conf, which means they'd be valid for all vhosts. Therefore, mod_mysql_vhost is ideal if your vhosts differ only in the domain and document root.

You can find the document here:
-------------------------------
http://www.howtoforge.com/creating-simple-virtual-hosts-with-mod_mysql_vhost-on-lighttpd-debian-squeeze


Creating Advanced MySQL-Based Virtual Hosts On Lighttpd (Debian Squeeze)
========================================================================

This guide explains how you can create advanced virtual hosts on a lighttpd web server on Debian Squeeze that are stored in a MySQL database. The method described here does not use the lighttpd mod_mysql_vhost module, and unlike mod_mysql_vhost (which allows you to store only the hostname and document root of a vhost in a database), this method allows to store individual configuration directives for each vhost in the MySQL database.

You can find the document here:
-------------------------------
http://www.howtoforge.com/creating-advanced-mysql-based-virtual-hosts-on-lighttpd-debian-squeeze


Managing A Headless VirtualBox Installation With phpvirtualbox On nginx (Ubuntu 12.04)
======================================================================================

phpvirtualbox is a web-based VirtualBox front-end written in PHP that allows you to access and control remote VirtualBox instances. It tries to resemble the VirtualBox GUI as much as possible to make work with it as easy as possible. It is a nice replacement for the VirtualBox GUI if you run VirtualBox in headless servers. This tutorial explains how to install phpvirtualbox with nginx on an Ubuntu 12.04 server to manage a locally installed, headless VirtualBox.

You can find the document here:
-------------------------------
http://www.howtoforge.com/managing-a-headless-virtualbox-installation-with-phpvirtualbox-on-nginx-ubuntu-12.04


CentOS 6.3 Samba Standalone Server With tdbsam Backend
======================================================

This tutorial explains the installation of a Samba fileserver on CentOS 6.3 and how to configure it to share files over the SMB protocol as well as how to add users. Samba is configured as a standalone server, not as a domain controller. In the resulting setup, every user has his own home directory accessible via the SMB protocol and all users have a shared directory with read-/write access.

You can find the document here:
-------------------------------
http://www.howtoforge.com/centos-6.3-samba-standalone-server-with-tdbsam-backend


Userdir Access On ISPConfig 3 Server
====================================

This tutorial describes how you can enable userdir based access on your ISPConfig3 server running apache2. At the end, your clients will be able to access their site via http://yourdomain.tld/~clientdomain.tld

You can find the document here:
-------------------------------
http://www.howtoforge.com/userdir-access-on-ispconfig-3-server


++++++++++++++++++++++++++++++++++++++++++++++++++++++++++++++
++++++++++++++++++++++++++++++++++++++++++++++++++++++++++++++

You can now support HowtoForge by becoming a subscriber:

HowtoForge Subscription
=======================

*** New! We now accept RBS WorldPay payments in addition to PayPal. ***

For a monthly fee of 5 EUR or 25 EUR for half a year, you can become a HowtoForge supporter and help us cover our costs (servers, bandwidth, etc.) and support ISPConfig development. In return, you receive the following benefits:

1. Download the ISPConfig 3 Manual (from http://www.howtoforge.com/download-the-ispconfig-3-manual).
2. Access the whole HowtoForge web site without any ads.
3. Download the results of our tutorials as VMware images (where available) (a list of downloadable VMware images is available here: http://www.howtoforge.com/list-of-downloadable-vmware-images).
4. Download our tutorials as PDF files.
5. View our tutorials as printer-friendly pages.
6. You will be marked as a "HowtoForge Supporter" in your forum posts.
7. Plus, you support the ISPConfig development.

If you have the free VMware Server or Player installed, you can import our VMware images and start playing around with the results of our tutorials immediately. It's a great way to track down problems with your own setup or simply to save time. ;-)

More details can be found on http://www.howtoforge.com/subscription.

++++++++++++++++++++++++++++++++++++++++++++++++++++++++++++++
++++++++++++++++++++++++++++++++++++++++++++++++++++++++++++++

Best Regards,

Your HowtoForge Team
Email: info@howtoforge.com
URL: http://www.howtoforge.com

To unsubscribe or update your records, click here: http://newsletter.howtoforge.com/howtoforge/user/update.php?email=matrixunix.ubuntu@blogger.com&code=d8531959c7da2982ec3a7f8f82a13961

Tuesday, August 21, 2012

TechSource: Top Medical Apps for Android

TechSource: Top Medical Apps for Android


Top Medical Apps for Android

Posted: 21 Aug 2012 12:30 AM PDT

Whether you are a diligently working intern or an accomplished doctor, you still need to look up stuff on the Internet. Also, if you're an aspiring doctor, there are a lot of resources on the web that can help you make your work life better. That said, looking up stuff online every time isn't that convenient. Also, you can't sit in front of your laptop or desktop all day long.

That's where medical apps come to the rescue. Once installed, these applications will let you lookup important stuff, help with your diagnosis, and become better in your profession. So, without much ado, here are the best medical apps for Android:


Medscape

Medscape is a free application that allows doctors and pharmacists look up information about more than 8000 brand and generic drugs, OTC drugs, and supplements. Useful for looking up what to prescribe, Medscape also lets you check for drug interactions with just the touch of a button. Furthermore, the app also lets you view medical news and critical alerts in 34 specialties.

Among other features, Medscape comes with over 129 medical formulae, scales and classifications. It contains more than 600 drug monographs and integrated dosing calculators. Thus, it goes without saying that this app is pretty much indispensable for interns as well as practicing doctors.


Human Anatomy


Though not essentially helpful for practicing doctors, this next app does serve as a good educational tool for budding interns. Human Anatomy is a simple reference app for studying the human anatomy in detail.


First Aid

You don't have to be a doctor to be of help to someone in an emergency situation. First Aid is a very useful free app for those who are looking to learn basic first aid techniques. According to the app developer: "First Aid is designed to help you follow the right procedures in a stressful situation or support other people by giving them instructions. It is based on illustrations, videos and short texts that show you how to take the necessary action step by step and in the right order." Rated 4.5 out of five stars on the Google Play Store, First Aid is freely available for download.


ICE: In Case Of Emergency

If you're ever in a medical emergency, then this next app will surely be of some help to you. In fact, it might even save your life. Once installed, ICE makes information like important medical contacts, allergies, conditions, and prescriptions easily accessible to the person who is handling your phone while you're not in a condition to do so. Also, the app can display emergency information even while the screen is locked.


Epocrates

Epocrates is a free application that gives you drug, disease, and diagnostic information. Used by many doctors, it can serve as a reliable drug reference application as it comes with thousands of drug monographs, interaction checkers, pill identifiers, and health plan formularies. Overall, Epocrates is a very useful app if you're in the field of medicine.


Skyscape Medical Resources

Skyscape Medical Resources is a great free app that comes with drug information, medical calculators, and clinical information on over 850 topics. The app includes a lot of detailed information about thousands of branded and generic drugs. Though free, most of the important resources are available as premium services.


Mediquation Medical Calculator


Mediquation is simply the best medical calculator out there. This paid app comes with over 232 formulae and scores. With support for both SI and US units, Mediquations gives you references, full equations, PubMed links and more. Fully compatible with Ice Cream Sandwich, Mediquation has also been chosen as 'Staff Favorites' in the iTunes app store. Rated 4.4 out of 5 stars, Mediquation Medical calculator can be purchased from the Google Play Store.


Saturday, August 18, 2012

TechSource: How to Create Virtual Machines in Ubuntu

TechSource: How to Create Virtual Machines in Ubuntu


How to Create Virtual Machines in Ubuntu

Posted: 17 Aug 2012 08:12 PM PDT

Virtualization is one of the best ways to bridge gaps between different operating systems. Earlier, if one had to try out a new operating system, they would generally have to make changes to their system like formatting and reinstalling the other OS. This, however, changed when virtualization came along. It allowed users to try out one operating system on top of another without making drastic changes to the system or without affecting the computer's performance in any major way.

With virtualization, users could create virtual machines that allowed them to install Linux on top of Windows and vice versa. Nowadays, virtualization is one of the most booming sectors in the field of IT. So, if you are curious as to how to get started with virtualization, here is a quick how-to on creating virtual machines in Ubuntu using one of our favorite virtualization software VirtualBox.


Step 1: Install VirtualBox


To install VirtualBox, open your Linux terminal (Ctrl + Alt + T) and type in or paste the following commands:

sudo apt-get install virtualbox

Then, open the Launcher (Super key) and type in 'Virtualbox' without the quotes.


Step 2: Create new virtual machine


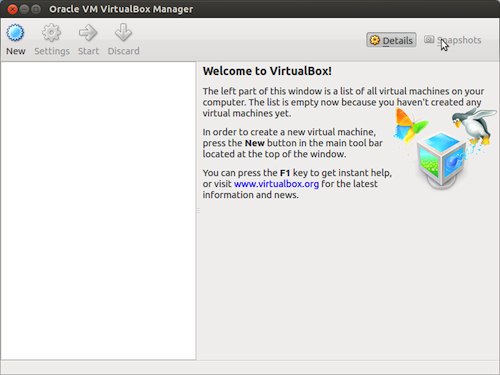
The Oracle VM VirtualBox Manager with a welcome message will appear. On the VirtualBox Manager top menu, click on the 'New' button.


Step 3: Follow the wizard

A Virtual Machine Wizard will guide you through the entire process of installing a new virtual machine. Click on the 'Next' button.


Step 4: Name your virtual machine and select OS type and version

Give a name to your virtual machine. You can call it whatever you want. Also, don't forget to select the operating system you want to load on it. Here, in this case we have selected Ubuntu.


Step 5: Allocate RAM

Then, select the amount of base memory you want to allocate. In other words, this is the amount of RAM your virtual machine will have while it is running. Depending upon the memory you have on your computer, you can allocate a small amount of it for the virtual machine but 512MB is recommended. We'd stick with 512 MB; however you can also go for higher numbers if you have a good amount of RAM.


Step 6: Create virtual hard disk


Then, create your virtual hard disk. This will be the amount of hard disk space your virtual machine will use while it's running. It is here you'll be storing all the operating system files and other stuff. In the virtual hard disk creation wizard, select the option that says 'Create new disk'. VirtualBox automatically recommends you the space and other options so don't worry, simply click 'Next'.


Keep the file type to VDI...


Choose the amount of hard disk space you want for your virtual machine. It's always better to stick with the recommended options.


Et voila! You're done. Just click on the 'Start' button to boot up your virtual machine and enjoy!


You may also check out our other handy articles about virtualization:

* Virtualization Software For Ubuntu Linux

* How to Increase the Size of VirtualBox Virtual Machine Disk Image

* Running Windows with Linux: Virtualization or Dual Boot?

* How to Install Windows 7 on Ubuntu Using VirtualBox


Written by: Abhishek, a regular TechSource contributor and a long-time FOSS advocate.